
Uwagake Chidori Kagari Variations
One of the most classic and recognized stitches in temari-making is Uwagake Chidori kagari. It's commonly used to make a kiku motif, as well as in creating other designs and motifs. It's often the first stitch a student will learn, and it's one of the four required submissions of work for the JTA Honka/Level 1 certification exam. The hallmark of the stitch is the
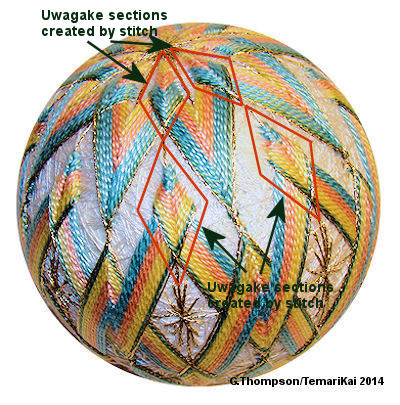 "woven wedge" that forms as the stitch is worked. An example of
traditional Uwagake is shown to the right.
"woven wedge" that forms as the stitch is worked. An example of
traditional Uwagake is shown to the right. Uwagake Chidori Kagari is one of the most common, popular and basic stitches. While the basic form is simple, there are many style variations that can be applied that result in differing artistic outcomes to that classic, standard wedge (probably as many as there are temari artist imaginations). There are some however that have become more commonly used and can be found (sometimes very subtly) in the Japanese books. It's important to note that "variations" here means making actual adjustments in taking the stitch, as opposed to applying extra styles (such as nejiri/interlocked) to rows of standard uwagake chidori.
Beginning in the spring of 2015 the TalkTemari group began a gradual journey through some of them. A collection of short tutorials from that work has evolved and been summarized. These are not full project designs, just the working stitch path; they can be practiced on any standard division and then applied in any manner that one's imagination can dream.
There should be a mastery and understanding of standard uwagake chidori kagari before delving into variations. The upper woven wedge that is the hallmark of the stitch should be neat, crisp, and symmetrical; if this hasn't been mastered then working the variations is going to have disappointing results. When working the different styles, pay attention to the tension of the stitches - it may need to be adjusted (most often loosen a bit) especially if working on a smaller ball and/or lesser-value division (as in say an 8 versus 12 or 16). Remember that just as regular Uwagake Chidori can be worked on any value division or marking, so too can these variations; the division shown is not required for working the stitch path. It helps greatly to recall the working rule of "lay the thread where you want it to go and take the stitch to keep it there". It usually is easier to begin stitching at the bottom point rather than the top, since adjusting the pole/upper stitches can make it more difficult to start and stop threads. In most applications, it doesn't matter how long the points are or how close to the pole the upper stitches are placed; both can be varied as desired just as in traditional uwagake. Therefore, these guides focus only on the stitching paths for each unless otherwise needed. One way to have fun exploring these stitches is to work them in the centers of an 8-Toubun or 10-Toubun division, in a sampler-style design.
 |
 |
 |
| Uzu Uwagake (Uzu means "spiral" or "whirlpool") | |||
 |
 |
 |
 |
| Uzu Uwagake: Uzu refers to a spiral or whirlpool effect. | 1. Anchor the thread at the lower point on Line 1. Move 2 jiwari to the right and take an upper stitch on line 3. | 2. Take the lower point stitch on Line 2, in between the two lines that have been stitched on. | 3. Move 2 lines to the right and take an upper stitch on Line
4. |
 |
 |
 |
 |
| 4. Continue in this manner around the center. | 5. Notice the needle placement/angle when working successive rows | 6. Bottom points must be stretched | 7. Groom threads and points as work progresses. |
| Uwagake #2 | |||
|
|
 |
 |
 |
| Uwagake Variation #2 | 1. Place pins as follows: a=1/3xy; b=1/4xy; c=1/2xy |
2. Anchor at a; enter at 1 (Xa), exit at 2 (Xb) |
3. Stitch at c |
 |
 |
|
 |
| 4. Enter at 1, exit at b, enter at c | 5. Continue around to start. | 6. Begin 2nd round under thread at a. | 7.Continue rounds to fill space between 1 and c. |
| Uwagake #3 | |||
|
|
 |
 |
 |
| Uwagake Variation #3 | 1. Work one row of regular Uwagake Chidori Kagari on both sets of lines. | 2. For row 2 and all successive rows, pass the thread UNDER the stitch of the previous row. | 3. The stitch is then taken as usual. |
 |
 |
 |
| 4. Carry the thread over and down to the next line for the bottom point stitch (remember to stretch). | 5. Continue on each upper stitch by passing thread under previous rows before taking stitch | 6. Keep that needle entry in the same place as if working normally; don't allow the stitch width to shrink and become narrow just because it's hidden. If the stitch width isn't the same as the visible threads, they will collapse without anything under them. |
This
is a TemariKai.com Printable Page; © 2014, all rights reserved.
Right click to print one copy for personal use.
Last updated 11/2015 © 1998 - 2015 TemariKai.com, G. Thompson/PuffinStuff, Inc.