
Kousa Kagari or Style: Interwoven Designs
Kousa means interwoven. In order to achieve the interwoven goal, the designs are stitched in layers: one (or more, but most often one) row(s) is/are stitched on each shape as they occur in the design to complete a layer. The next layer is not begun until all rows of the current layer is complete. It is this method that evolves a final pattern that appears to have been woven, but not to be confused with Orime kake patterns that are indeed worked by weaving through existing threads. The basics of kousa kagari are shown in the Kousa page in the ToolKit, but it's a style that deserves a bit more exploration.
Kousa style is very common in temari
 designs; it can occur
innately as part of the stitching process, or it can be specifically
applied. The interplay of 2 sets of uwagake
chidori kagari to create a kiku
design is one of the most simplest forms. One or more rows are
stitched on each path of the design as they occur on the ball to
complete a layer; the next layer is not begun until all of the current
layer is complete. It is this method that evolves a final pattern that
appears to have been "woven" together (not to be confused with some
patterns that are indeed worked by weaving through existing threads),
yet no actual "under-over" work with the needle has been done.
designs; it can occur
innately as part of the stitching process, or it can be specifically
applied. The interplay of 2 sets of uwagake
chidori kagari to create a kiku
design is one of the most simplest forms. One or more rows are
stitched on each path of the design as they occur on the ball to
complete a layer; the next layer is not begun until all of the current
layer is complete. It is this method that evolves a final pattern that
appears to have been "woven" together (not to be confused with some
patterns that are indeed worked by weaving through existing threads),
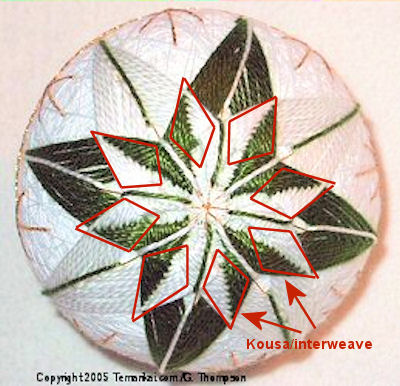
yet no actual "under-over" work with the needle has been done. The photo to the right shows the simple interweave that forms with a 2-set uwagake chidori stitching pattern. Note how in the areas indicated in the red diamonds the threads cross over themselves, building row by row working down from the pole. This effect occurs as the kiku design is worked in alternate layers, one round with white, one with green, repeating.

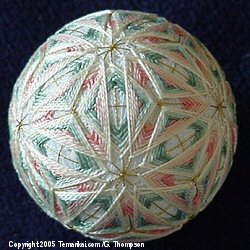
In this pattern shown at left, the interweave is very clear to see. One layer of the design is one round stitched in on each shape in the prescribed color. As the layers build, the interweave of the threads is clear. In this example, the design covers more of the mari, but there is still negative (areas of the mari wrap where there is no embroidery) space contributing to the outcome. This design also requires specific attention to the kousa style for it to be achieved. Not only must there be one round in the proper color, each shape must be stitched in the exact same sequence in each layer.
In the example to the right, worked on a C10, not only must the sequence of the shapes be maintained as each layer is stitched with one row at a time, the color shading must be paid attention to as well. Again, the use of negative space is important in the overall design; while a good portion of the mari surface has been covered with stitching, it does still show.
Some of the most impressive k
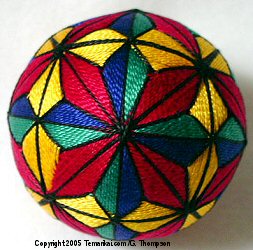 ousa styles are ones where the entire
mari surface is covered, as in the example to the left; these are also
known as "all-over" designs. These designs require as close to perfectly
round a mari as is possible, and as accurate a division and marking as
possible in order to close out and work properly. This example uses a C8
division and the subsequent faces that emerge from the marking; one
round per layer, and each face shape is a different color. The black
outline is stitched afterward as embellishment, giving a resemblance to
stained glass. It helps to wrap the mari in an unobtrusive color if
working an all-over design; that is, one that does not contrast highly
with the design colors, in case there is a bit of the mari wrap showing
(happens to the best of stitchers). Marking threads likewise should be
low-key so as not to pop if they show through.
ousa styles are ones where the entire
mari surface is covered, as in the example to the left; these are also
known as "all-over" designs. These designs require as close to perfectly
round a mari as is possible, and as accurate a division and marking as
possible in order to close out and work properly. This example uses a C8
division and the subsequent faces that emerge from the marking; one
round per layer, and each face shape is a different color. The black
outline is stitched afterward as embellishment, giving a resemblance to
stained glass. It helps to wrap the mari in an unobtrusive color if
working an all-over design; that is, one that does not contrast highly
with the design colors, in case there is a bit of the mari wrap showing
(happens to the best of stitchers). Marking threads likewise should be
low-key so as not to pop if they show through. As mentioned above, one of the most important things about working an all-over kousa style design occurs before you start stitching the pattern. Perhaps in no other pattern class of temari is it more important to have as round a mari and as accurate a division as can be attained. Deviations from these will be more apparent than in other patterns, since errors will result in "open spaces" where the pattern is supposed to close in and cover the mari. It's almost impossible to prepare a perfectly round mari and absolute accurate markings, so it's not unusual to need to work some some extra fill-in stitches when the design is complete. The trick is to execute them in ways so that they blend invisibly into the overall design. Grooming the threads as you go, being sure that threads are placed or groomed into proper orientation, paying attention to direction of lay, parallels, perpendiculars and where things are supposed to intersect, are valuable investments of time and effort. Placing additional pins as landmarks to hit as you stitch, to be sure that all areas are closing in at the same rate, can help. Keeping watch on the whole rather than just the smaller area being stitched is a must.
The most critical concept of working kousa designs is keeping track of where you are. Interwovens on simple/vertical divides are easy to visualize although if you are working a design that has a high number of divisions, keeping track of your starting line and where you are in relation is important. On C8s and C10s, identifying which face you began working around and then moving in the same orientation is critical - if a mistake is made, the resolution and accuracy of the interweave will not happen, and the design will not have the definition and crispness that it should. At the worst, it may not even work out at all. You must move from one face to the next in the same sequence all the time. It can be easy to visualize this in some designs; others are much more difficult. It's a fairly firm statement to say that the next lozenge to be stitched is going to be the one that is fully "under" the threads of all adjacent threads. Careful inspection for this can sometimes reorient you, but it is vital to keep your place, especially when putting your stitching down for a period of time.
There is a simple way to keep track of things: label the faces (necessary) and keep notes (if needed). If you knit, you know that many times you need to jot a note to yourself when you stop in the middle of an intricate pattern sequence so that you can pick up in the proper place where you left off. Temari patterns can have the same need. One way or the other you need to identify the poles and faces on the division. There are many "unique" pins available in notions, craft and quilting departments - and many of these work well on 6-centers designs. You can use a specific color sequence, or even something as simple as using plain dressmakers pins, putting one pin in the center of the first pole, two pins in the middle of the second pole and so forth. Another option is to cut small circles and write numbers on them - pin one each in the center of a face.
It's easier to make "pin flags" with regular straight pins, and either self stick labels (something like file folder or address labels, computer labels etc.) or tape. Cut a small piece about 1 1/4 inch by 1/2 inch; fold it in half and cut notches on each side (this is optional but it can help if you are using pins with larger heads); wrap it around the pin so it sticks together and mark the number on it. Adjust the size of the tag if you prefer. Granted, pins will catch threads as you stitch, but dealing with that is much better than losing your place in an involved design.
Remember that while many kousa designs are stitched one row per layer, this can vary, and some interesting and beautiful outcomes can emerge. Experiment a little bit and see what happens. Just remember that you need to be able to replicate the sequence.
It's important to understand the difference between Kousa and Nejiri. Nejiri is worked element by element. Kousa is worked row by row.
 |
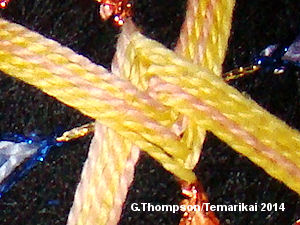 |
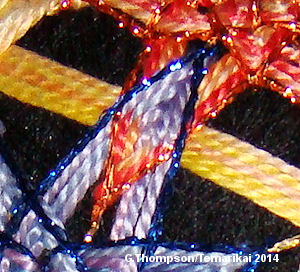
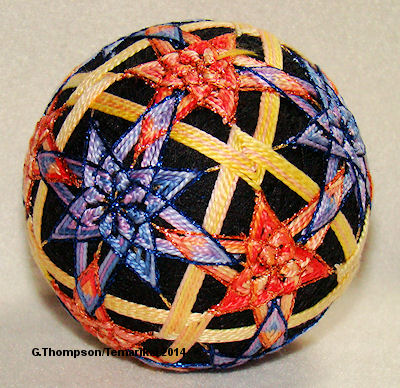 |
| This first illustration shows kousa (interwoven); the second shows nejiri (interlocked). The temari shows both styles in use in one design. | ||
This
is a TemariKai.com Printable Page; © 2014, all rights reserved.
Right click to print one copy for personal use.
Last updated 1/2014 © 1998 - 2014 TemariKai.com, G. Thompson/PuffinStuff, Inc.