Asa-no-ha - Hemp Leaf
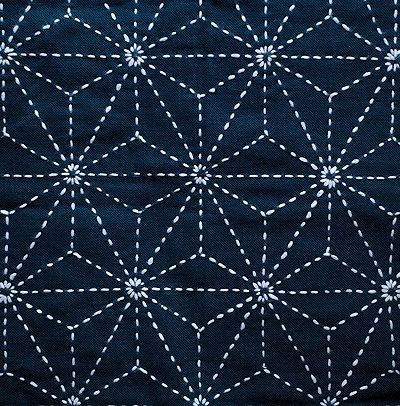
Asa-no-ha (asa means hemp; no means of, ha means leaf) is one of the most enduring & popular designs in Japanese textiles, especially on kimono and in Sashiko embroidery. It is not limited to textiles - it appears in almost every facet of Japanese design. Hemp, especially in
 ancient Japan
was used extensively for making textile fiber as well as paper and
functional fibers such as rope. It is strong and grows rapidly, so the
pattern was often used on clothing for newborns and infants, but it has
no seasonal limitations. The motif is not limited to Japanese style - it
shows in many Asian cultures.
 The traditional pattern is a geometric arrangement of six symmetrical diamonds radiating from a center point, which can then interlock with each other in a repeating pattern. Rather than being inspired by the hemp plant, the pattern was named Asanoha after its establishment because of its resemblance to the hemp leaf, which is exception to the norm. Usually a design is created with an inspiration in mind and so named; the reverse is true here. It can be used as the focal point of a design or as a background. While common in other Asian cultures, only in Japan is it identified as "hemp leaf".
When adapted to Temari, the number of radiating diamonds varies, based on the faces emerging
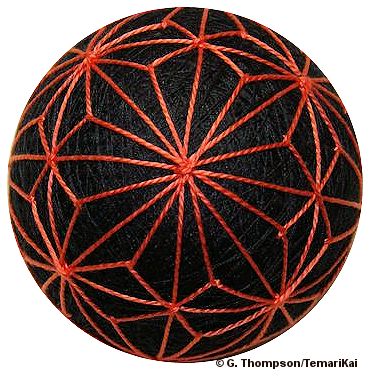 from the
division or marking. 8 and 5 are common due to the popularity of C8
 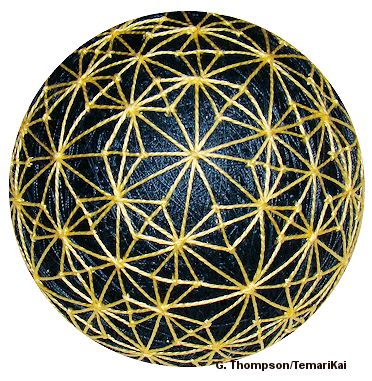 and C10 divisions. Creating
the actual traditional 6 diamond arrangement is a bit more involved,
needing either the hexagons that emerge from a multiple face marking, or
by specifically laying down a stitching grid of extra marking lines. The
interaction of the motif elements on a Temari can be delightful, but it
should also be noted that it's the diamonds radiating from a center
point that ties the motif to Asahoha. A singular temari can be made with
the design arranged completely around the mari, or smaller sections of a
design can be stitched in Asanoha. For this reason it is important to
learn how to work both applications. The design is very flexible in
other ways; it can be left to stand alone, it can be worked in
combinations of single and double thread to create textural variety, and
the lozenges of the design can be filled or shaded, just as a few ideas.
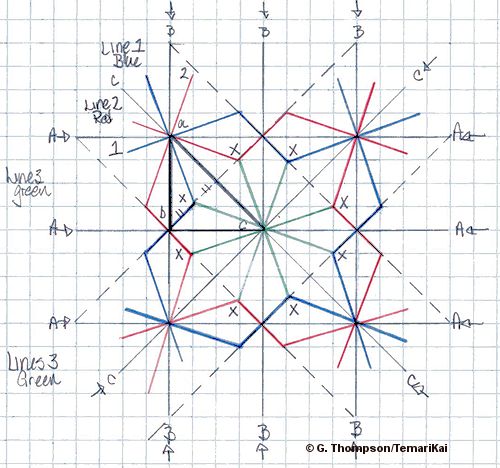 |
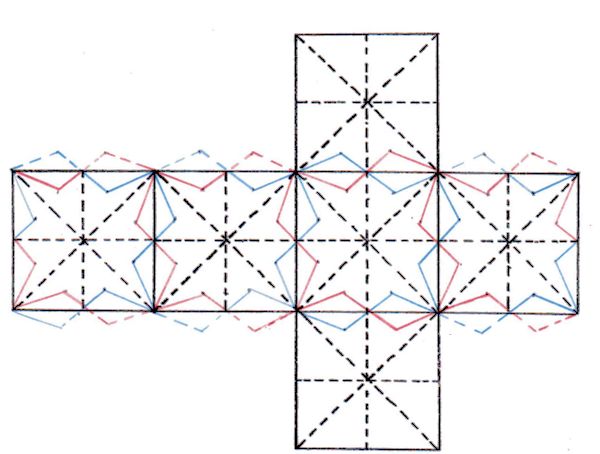
The diagram to left maps out the motif as it would apply to a
C8 marking. The center square of the diagram corresponds to the
8-point center of the C8. If the design is being applied without a C8 marking, then
it begins with laying down the guidelines A, B and C within the
area being stitched. If a C8 marking is used, these lines are
not needed, they are present in the marking. As mentioned above,
traditional Asanoha is 6 symmetrical diamonds radiating from a
center point; adapted to C8 in temari, there are 8 symmetrical
diamonds. There will be six non-symmetrical diamonds on the
6-point faces. Stitching path lines are Line 1 blue, Line 2 red, Lines 3, green. |
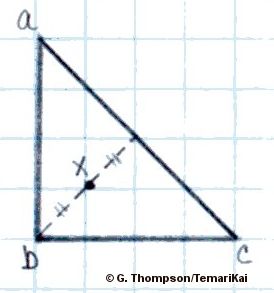 |
Part of the motif - and the most important part - is "stitched off the grid", so as to speak - that is, a stitch is taken in open area on the mari, not around a marking line as is generally the case. The diagram to the left is an enlarged section, triangle a-b-c from the larger diagram above. Note that the stitches are all placed on Points X. Locating this point is is not just "estimating" each time - it would be very difficult indeed to have a continuous and symmetrical, even outcome. Nor can it be measured in absolute value - that will change with each different mari. Point X is placed by visualizing a perpendicular line dropped from the apex (b) of the triangle to the opposite side (a-c), and placing the stitch 1/2 of this distance at x. |
| Lines 1 and 2, shown in blue and red in the main diagram, are stitched following this procedure and indicated path. After these 2 paths are stitched, then the centers are completed by adding stitches from Pt C (center) to Points X (green line). Note that this is the traditional stitching path. Your eye may try to take you in other directions, but the traditional path is working lines 1 and 2, and then adding Lines 3. | |
 |
|
| Applying this to a C8 marking is actually quite straightforward. If the C8 marking is diagrammed as shown above, Lines 1 and 2 shown in blue and red become easy to follow. |
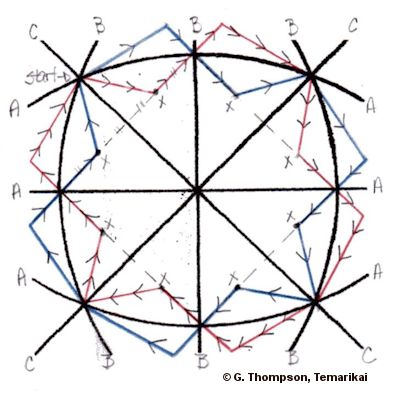 |
The diagram to the left shows one center of the C8 marking, with stitching paths 1 and 2. It's easy to correlated it to the main path diagram above. These paths are worked around the mari on all 6 main centers. It may help to first lay down temporary guidelines with waste thread as shown at left - the dotted black lines forming a vertical square around the 8-point center. Once your eye becomes used to placing the stitches at Points x, you may not need extra guidelines. |
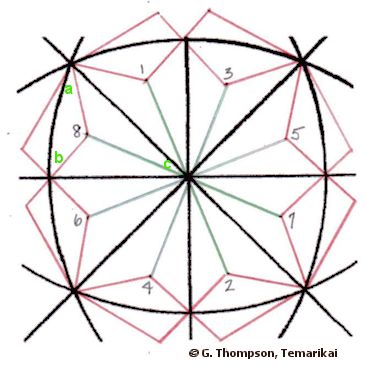 |
After Lines 1 and 2 are stitched, then the center lines are placed. The stitches should just overlap into the corners created by Lines 1 and 2 to form a tight, neat intersection. They can be worked in long straight stitches, Point 1 to 2, to Point 3 to 4, etc. A neat tacking stitch in the center finishes it all off. |
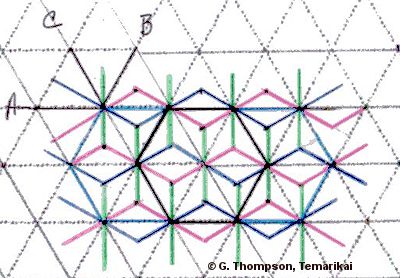 |
Obtaining a "true" Asanoha motif, with 6 symmetrical diamonds radiating from a center point is worked on a hexagonal grid. The hexagons that emerge from multiple-face markings are an excellent base. However, Asanoha is often used as a stand-alone design in sections of temari. Using waste thread, lay down guildlines A, B and C. Stitch the design shown in red and blue lines, and add center lines in green. |
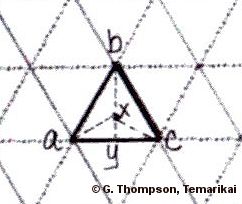 |
This shows an enlargement of the triangle used for locating Points x. Drop a line apex b to base a-c. Point x is 1/2 to 2/3 of b-y, depending on the size of the mari. Whichever you choose, be consistent in order to obtain the symmetry of the design. |
This
is a TemariKai.com Printable Page; © 2014, all rights reserved.
Right click to print one copy for personal use.
Last updated 7/2014 © 1998 - 2014 TemariKai.com, G. Thompson/PuffinStuff, Inc.
