
Tamentai - Multiple Faces/Centers Markings
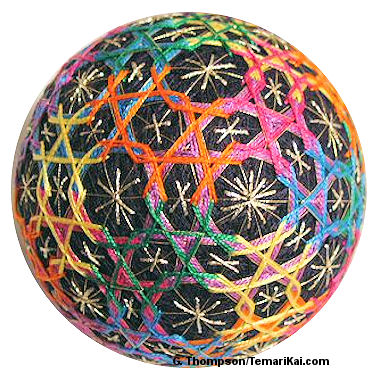
Tamentai (ta means many; mentai means face or shape), or multiple face (also called multiple centers, but technically the marking does not add more poles or centers, just faces) temari can look intimidating while being stunningly beautiful. The most common forms are created by adding extra
 marking
lines to a 10-Combination standard
division so that sides of either the diamonds or the triangles are
divided into prescribed numbers of segments for the number of faces
desired, using standard multiface
reference charts. Tamentai markings are not beginner techniques,
but are well within reach of anyone with some experience. One does need
to have a solid working ability with 10-combination
divisions, since this is the base standard division used. The
starting C-10 must be on a round mari, and the C10 division must be
accurate.
marking
lines to a 10-Combination standard
division so that sides of either the diamonds or the triangles are
divided into prescribed numbers of segments for the number of faces
desired, using standard multiface
reference charts. Tamentai markings are not beginner techniques,
but are well within reach of anyone with some experience. One does need
to have a solid working ability with 10-combination
divisions, since this is the base standard division used. The
starting C-10 must be on a round mari, and the C10 division must be
accurate.Multiple face designs are often involved, both in marking and stitching, but the lower value ones are more
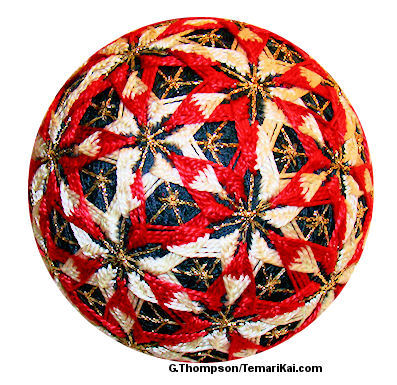 easily
manageable. They are usually rather intricate, and on a larger mari base
than one might be used to - the do tend to need more real estate. Some
designs are repetitions of a motif within the sets of
pentagons/hexagons, and create a temari that looks like a multi-facet
wonder. Other designs may flow out from the pent/hex sets into different
pathways around the temari. Or, various abstract polygons can be found
and used to create different shapes and patterns with the detail of the
marking lines. Other times
easily
manageable. They are usually rather intricate, and on a larger mari base
than one might be used to - the do tend to need more real estate. Some
designs are repetitions of a motif within the sets of
pentagons/hexagons, and create a temari that looks like a multi-facet
wonder. Other designs may flow out from the pent/hex sets into different
pathways around the temari. Or, various abstract polygons can be found
and used to create different shapes and patterns with the detail of the
marking lines. Other times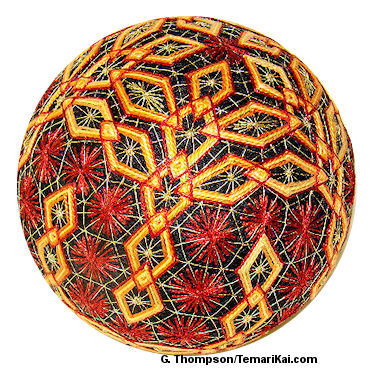 they
can form the grid that guides freestyle embroidery. While a perfectly
executed tamentai can stand on its own, (especially with expressive
color choices for the marking lines), the greater challenge is to create
a design that branches out from the usual sets of pentagons and
hexagons; many design possibilities emerge from the centers and faces
created in the markings.
they
can form the grid that guides freestyle embroidery. While a perfectly
executed tamentai can stand on its own, (especially with expressive
color choices for the marking lines), the greater challenge is to create
a design that branches out from the usual sets of pentagons and
hexagons; many design possibilities emerge from the centers and faces
created in the markings.The number of centers that can be created (standard reference charts are commonly available) is limited only by the size of the mari. Obviously the more centers, the larger the mari is needed; minimum is usually at least 25-35cm circumference (three to four inch diameter), but often larger. The mari needs to be as round as possible, with as accurate a 10-combination division as possible. (It's a good idea that if practice is still needed on either getting round mari and/or accurate 10 combinations, those skills be honed before attempting tamentai, since any ripple on those waves is going to knock things off kilter in a very noticeable way). Keep marker pins in the original 10 poles created by the 10 combination division, in order to stay oriented for both marking and working a design on the mari. Tacking centers of the faces as the are done can be a help. Use fine, crisp marking thread - there will be a lot of jiwari on the ball. When working on larger temari plan the stitching threads accordingly - thread consumption generally increases greatly (VERY!) - especially if using threads with dye lots.
It can also be very helpful when first starting tamentai to mark a few practice/learning mari, using contrasting colored threads for the different stages of marking. It gives practice not only in visualizing the process, but also tunes the technique of placing the extra lines. When those are complete, it will also create a set of reference mari to help see design possibilities, etc. Several Japanese books have sections that show preparing tamentai, but they can indeed be overwhelming to try to follow if the text can't be understood. We're fortunate here to have lots of help from Ai and her teachers, and additional Japanese translators. It should also be noted that there are a few ways to approach laying down the marking lines, so if your books show something different than what is presented here, that's why. Continue to read the basic information below, and also refer to the illustrated step-by-step of working a 92 incomplete / 272 complete marking.
 Some basics: Tamentai result in groups of hexagons
surrounding a center pentagon (the pentagons are the original centers
of the C10 division). The hexagons, as well as the total overall
marking (the whole mari) can be described as perfect
or imperfect. However, an
easier way to grasp these differences is closer to complete
or incomplete. It's
important to understand that these classifications come from the
Japanese translations - they do not refer to the marking being
"finished" or not. Some values of tamentai are by nature "incomplete".
Some basics: Tamentai result in groups of hexagons
surrounding a center pentagon (the pentagons are the original centers
of the C10 division). The hexagons, as well as the total overall
marking (the whole mari) can be described as perfect
or imperfect. However, an
easier way to grasp these differences is closer to complete
or incomplete. It's
important to understand that these classifications come from the
Japanese translations - they do not refer to the marking being
"finished" or not. Some values of tamentai are by nature "incomplete".
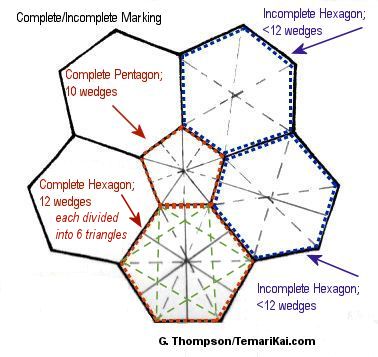
Perfect/complete is when all of the pentagons are subdivided into 10 wedges (similar to pie slices) as well as all of the hexagons created in the marking are subdivided into 12 wedges, each cross-hatched with a set of 6 smaller triangles inside. A perfect hexagon is shown outlined in red in the diagram to the left. A perfect shape is generally defined as having the same number of wedges as its number of sides multiplied by 2 (ie, a hexagon has 6 sides, therefore perfect is 12 wedges. A pentagon has 5 sides, therefore perfect is 10 wedges). Note that by definition, the pentagons are always perfect, having been created in the original C10 division. A complete marking has all complete centers (both pentagons and hexagons). (Detailed info about complete/perfect markings is illustrated here).
Imperfect/incomplete is when the resulting hexagons may contain only 6 or 8 wedges (shown in the hexagons outlined in blue in the diagram), as naturally occurs in the initial addition of marking lines (as described below) in multiface markings. An incomplete marking has a combination of complete (all of the pentagons) and incomplete centers (hexagons).
Note that perfect/complete and imperfect/incomplete are not the same as geometric "regular" and "irregular", as they are used to describe geometric shapes. Shapes that emerge in multiple face markings need not be and indeed won't all be regular. Also remember that these terms do not indicate "finished" or "unfinished" - some values of multiface markings are simply incomplete if that is the number of faces used in the design. It refers only to the full complement of cross-hatched wedges in the hexagons, or not. For example, a 122-face marking is defined as incomplete because not all of the hexagons have 12 wedges. However, a multitude of designs is stitched on 122 face markings. On the other hand, if a pattern requires a 362-face marking, it will by definition be "complete", because you first work a 122-face and then continue to complete the hexagon divisions to create the 362. Don't become intimidated by complete versus incomplete; it is more important to concentrate on the number of faces needed as the goal, and just to understand that some hexagons may have 12 cross-hatched wedges, others less, and that's ok. Whether things are perfect or imperfect generally comes into play for pattern applications that actually use these higher-valued multiple faced markings. The most common number of multiple faced markings tend to be the inherent imperfect marking values.
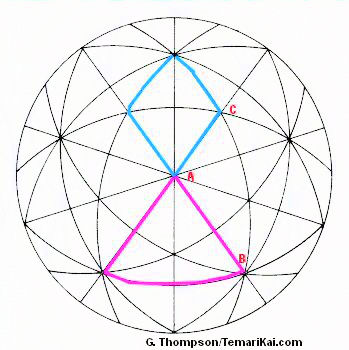
There are two subsets of multiple face markings, depending on which original face of the 10-Combination division is being subdivided. One works off of the large 6-Part Triangle AB. The other subset works off the 4-Part Diamond AC (this subset may be referenced in some books as being divided from a smaller triangle, but it is much easier to visualize and work as a 4-Part Diamond which is actually two small triangles). To work either subset, start with a 10 Combination division. Using the reference charts (here and in many Japanese books) and the final number of faces desired, look up which shape will be used and how many segments the sides will be subdivided into. Locate either the 6 Part Triangle shown in pink, or the 4 Part Diamond shown in blue in Diagram 1. Extra marking lines are added to divide these into smaller units according to the specs from the charts.
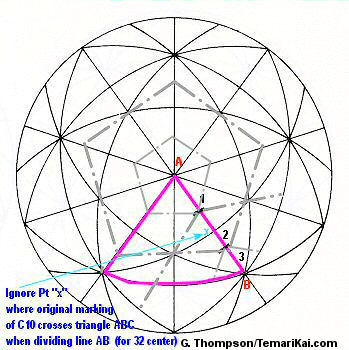
Example for 6-Part Triangle: Once the sides of the 6-part Triangle are divided into the required number (which will always be a multiple of 3), an easy way to add the extra marking lines
 is to
stitch as off-set pentagons around the poles of each of the original
pentagons from the 10 Combination division, since this is conveniently
set up by the resulting geometry. In this example (diagram to the right)
for a 32-face, AB is divided into 3. Focus on the pink triangle, and
side AB. Note that the path of the offset pentagons shown in the dashed
gray lines around the poles (Pts A and B), divides the
side of the triangle (pink line AB) into thirds (in this case, the
thirds are A-1, 1-2 and 2-B). In other words, add additional concentric
off-set pentagons around the C10 pentagon center, placing them so their
lines divide the 6-part triangle sides as required (check the chart for
the sectioning). This is repeated around all 12 C10 centers.
is to
stitch as off-set pentagons around the poles of each of the original
pentagons from the 10 Combination division, since this is conveniently
set up by the resulting geometry. In this example (diagram to the right)
for a 32-face, AB is divided into 3. Focus on the pink triangle, and
side AB. Note that the path of the offset pentagons shown in the dashed
gray lines around the poles (Pts A and B), divides the
side of the triangle (pink line AB) into thirds (in this case, the
thirds are A-1, 1-2 and 2-B). In other words, add additional concentric
off-set pentagons around the C10 pentagon center, placing them so their
lines divide the 6-part triangle sides as required (check the chart for
the sectioning). This is repeated around all 12 C10 centers.(Note that when dividing into thirds for a 32-faces, you are ignoring the original division line between 1 and 2 that crosses line AB at Pt "x". BUT - using any other multiple of 3 for the number to divide the 6-Part Triangle WILL use Pt x as a placement for extra lines. It is ignored ONLY for the 32 face marking).
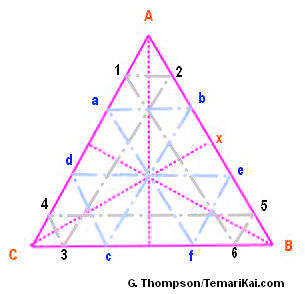
While some people are comfortable
stitching the sets of off-set concentric pentagons to achieve the
6-Part Triangle sections, another way of adding the extra marking
threads for dividing the 6-part Triangle is to work within each
triangle. The triangles are cross-hatched in the manner shown to the
left. This shows the triangle sides being being divided into 6
sections - remember, multiple of 3 - rather than 3 sections as used in
the example above. Therefore, pt x does
become a used position for 6 sections as opposed to ignoring it for 3
sections. This grid is stitched in each triangle, which all merge to
create the full marking. Alternatively, the concentric pentagons could
be used, dividing the triangle sides into 6.
To determine the number of centers that
result on the (initial) imperfect marking using the 6-part triangle,
the formula is: (1/3X²) x 10 + 2 = # of imperfect centers using 6-part
Triangle, where X is the number side AB is being divided by (remember,
X must be a multiple of 3). (To clarify the formula: multiple X
times X, then divide by 3. Multiply that result by 10. Add 2.). Much
easier, however, are the reference
lists for the number of centers.
Example
for 4-Part Diamonds: This subset is presented in some books
and references as being worked in the smaller triangle that is half of
the 4-Part Diamond (shown in blue in the diagram). However, it's much
easier to approach it as the larger diamond; this makes for a bit less
work since it's a little more efficient. Find and focus on one side
of the diamond - line AC. Use
the charts to determine the number of faces and segments this
side is divided into. For this example it is into thirds, so it 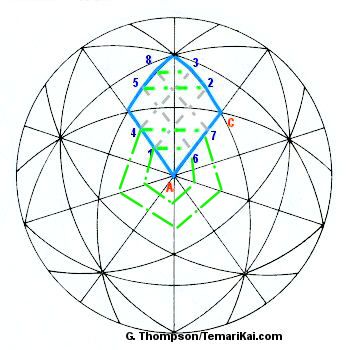 creates
a 92 center marking. This marking can be achieved by working the
cross-hatch within each diamond. Begin at 1, and follow the path set
up by the numbers in order, following the gray lines. Then, stitch the
green lines 1-6, 4-7, 5-2 and 8-3. A nice little community of little
triangles and diamonds is created inside that one larger one
that was the focus to start. Repeat this process in all of the larger
diamonds and it will have created a uniform multiple-center
marking. Adjust as needed for the number of sections you are
dividing side AC into.
creates
a 92 center marking. This marking can be achieved by working the
cross-hatch within each diamond. Begin at 1, and follow the path set
up by the numbers in order, following the gray lines. Then, stitch the
green lines 1-6, 4-7, 5-2 and 8-3. A nice little community of little
triangles and diamonds is created inside that one larger one
that was the focus to start. Repeat this process in all of the larger
diamonds and it will have created a uniform multiple-center
marking. Adjust as needed for the number of sections you are
dividing side AC into.
Just as the triangle set can be worked with concentric pentagons, so too can the diamond set. The difference is that the pentagons are NOT off-set, and the corners must be connected as shown in the gray lines.
When adding the extra jiwari by stitching concentric pentagons in either complete or incomplete markings, it helps to place a pin in at each original C10 pole as you complete the set of pentagons around it. After adding 1 or 2 sets it can become very confusing to visually keep track of where things are in the process. By adding a pin to the pole when each full set is complete, it will ensure that all poles have been worked when the full total of 12 pins has been added.
The result of this first stage of extra marking lines, regardless of achieving the desired number of extra faces, is always an incomplete marking per the definitions above. For steps on adding jiwari to ramp up the value to a complete marking, see the 92/272 example page.
To determine the number of centers resulting from this imperfect stage, the formula is : X² x 10 + 2 = # of imperfect centers using 4-Part Diamond, where X is the number side AC is being divided by. (It does not have to be a multiple of 3 for this method). (To clarify the formula: multiply X times X. Multiply that result by 10. Add 2.) As in the Triangle method, there are reference tables for the number of centers.
creates
a 92 center marking. This marking can be achieved by working the
cross-hatch within each diamond. Begin at 1, and follow the path set
up by the numbers in order, following the gray lines. Then, stitch the
green lines 1-6, 4-7, 5-2 and 8-3. A nice little community of little
triangles and diamonds is created inside that one larger one
that was the focus to start. Repeat this process in all of the larger
diamonds and it will have created a uniform multiple-center
marking. Adjust as needed for the number of sections you are
dividing side AC into.Just as the triangle set can be worked with concentric pentagons, so too can the diamond set. The difference is that the pentagons are NOT off-set, and the corners must be connected as shown in the gray lines.
When adding the extra jiwari by stitching concentric pentagons in either complete or incomplete markings, it helps to place a pin in at each original C10 pole as you complete the set of pentagons around it. After adding 1 or 2 sets it can become very confusing to visually keep track of where things are in the process. By adding a pin to the pole when each full set is complete, it will ensure that all poles have been worked when the full total of 12 pins has been added.
The result of this first stage of extra marking lines, regardless of achieving the desired number of extra faces, is always an incomplete marking per the definitions above. For steps on adding jiwari to ramp up the value to a complete marking, see the 92/272 example page.
To determine the number of centers resulting from this imperfect stage, the formula is : X² x 10 + 2 = # of imperfect centers using 4-Part Diamond, where X is the number side AC is being divided by. (It does not have to be a multiple of 3 for this method). (To clarify the formula: multiply X times X. Multiply that result by 10. Add 2.) As in the Triangle method, there are reference tables for the number of centers.
Lessons
and translations: Ai M., Direct
translation and translation assistance: Milly K., Kiyoko T.;
Publications: Kaga Hana Temari (ISBN4-8377-0292 -9), Sosaku Temarizikushi (ISBN4-8377-0696-7), Edo Temari (ISBN4-8377-0394-1)
Publications: Kaga Hana Temari (ISBN4-8377-0292 -9), Sosaku Temarizikushi (ISBN4-8377-0696-7), Edo Temari (ISBN4-8377-0394-1)
This
is a TemariKai.com Printable Page; © 2014, all rights reserved.
Right click to print one copy for personal use.
Last updated 1/2014 © 1998 - 2014 TemariKai.com, G. Thompson/PuffinStuff, Inc.