
Maki Kagari - Hints and Tips
Maki kagari can be used in various designs, and spans the range of difficulty in Temari designs. They can be very simple (yet at the
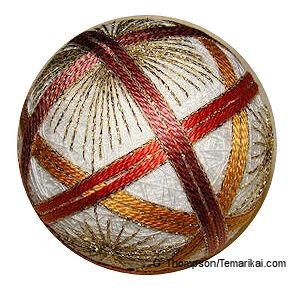 same time stunning
in their simplicity) or they can become very intricate. The bands can
simply overlap each other in repetitive manners, using varying numbers
of threads, or they can expand to be actual woven designs that can turn
out finely detailed images, similar to how a woven cloth can carry
finely detailed art. Stitched elements can be placed over or interwoven
with the wrapped bands, or the banded designs can stand on their
own. The basic technique is
rather simple, but some extra hints can help:
same time stunning
in their simplicity) or they can become very intricate. The bands can
simply overlap each other in repetitive manners, using varying numbers
of threads, or they can expand to be actual woven designs that can turn
out finely detailed images, similar to how a woven cloth can carry
finely detailed art. Stitched elements can be placed over or interwoven
with the wrapped bands, or the banded designs can stand on their
own. The basic technique is
rather simple, but some extra hints can help:There are two choices for measuring off thread when making Temari using wrapped bands: you can either pre-measure the length of thread needed by wrapping off around the mari the number of times you will be wrapping in a section of the design (including enough to anchor the thread at start and stop) or, attach a continuous thread. To anchor a continuous thread, follow the photos below: Thread a needle without cutting the thread from the spool. Run the needle through the mari base, entering the needle at the point you wish to begin the wrap. Pull the needle and the end of the thread through the mari. Anchor it by running the needle back into the same place it exited, and out at a random point. Snug the thread, and clip off the end. The thread is now exiting the mari at the point where the pattern wrap begins, and you have the full spool of thread at your disposal to work with without worries of running short.
 |
 |
 |
Not every maki design is a band - some spread out across the mari but the threads gather through keeper pins at the equator. While keeper pins help to guide things, it's also important to place the threads precisely as you wrap - the smoother you place them, the smoother will be the finished design especially where a lot of threads are converging at the obi. It's almost impossible to correct a messy keeper bundle once it's been done. As you delve deeper into wrapped patterns, you will find yourself trying to determine spacing and thread needs. At some point you will probably have to determine a thread gauge, unless you are following pattern directions to the letter in terms of mari size and thread being used. Gauge is how many wraps per cm (or inch, but cm is easier) the thread covers. There are several ways to do this: make a test band on the mari, wrapping for a given distance and count the number of rows required. Another is to wrap around a ruler, covering the distance from 1-2cm, and count the number of rows. Generally the finer the thread, the more patience is required in terms of laying successive rows, to be sure that the mari surface is completely and smoothly covered as the pattern requires. Maki designs do tend to eat thread, but the also can yield stunning results.
This
is a TemariKai.com Printable Page; © 2015, all rights reserved.
Right click to print one copy for personal use.
Last updated 3/2015 © 1998 - 2015 TemariKai.com, G. Thompson/PuffinStuff, Inc.